


TL;DR
- Custom Image Templates are Microsoft's supported and scalable way to build golden images for Azure Virtual Desktop.
- Azure Compute Gallery is the right destination for AVD images, providing versioning, re-use and cross-region scalability.
- Image Builder works best for core platform components but may not provide what IT teams need for legacy applications.
- Most issues with Custom Image Templates come down to permissions, networking or build VM sizing, not the template itself.
Introduction
Azure Virtual Desktop environments still depend on well-built golden images to deliver a consistent user experience and keep day-to-day management under control. How those images are built has a direct impact on how the AVD environment can scale.
Custom Image Templates are Microsoft's supported way of building and maintaining golden images for Azure Virtual Desktop. They sit on top of the Azure Image Builder, and when done correctly, integrate with Azure Compute Galleries.
In this post, I will aim to cover quite a lot, from golden images and templates, through to configuration and real-world considerations.
Let's go! 📸
What are Golden Images in Azure Virtual Desktop?
A golden image is a standard base image used to deploy Azure Virtual Desktop session hosts. It typically includes the operating system, baseline configuration and a common set of applications that every host should start with.
Golden images still matter in AVD:
- They provide consistency across the session hosts.
- Reduce the amount of configuration required post-deployment.
- And importantly, make it easier to support and scale the environment over time.
Golden images have been used for years across Citrix, Remote Desktop Service and traditional Windows device builds.
Across environments, many images are still created using the following process:
- Manually building the Azure Virtual Machine.
- Applying configuration (reg keys, policies) and applications directly.
- Running sysprep.
- Capturing the disk and creating an image.
This process works, and part of it may even be required (I'll get to this) - but consider the amount of time that could be saved and not forgetting the increase in accuracy if the majority of this work is automated.
Tip
This is where Custom Image Templates come in. Addressing these problems by automating the image build process, unattended, from built to published.
What are Custom Image Templates in Azure Virtual Desktop?
Custom Image Templates are Microsoft's supported way of building golden images for Azure Virtual Desktop. They are built on top of Azure Image Builder and are exposed directly to the AVD service, rather than being a standalone Image Builder deployment.
Custom Image Templates can be used at a high level to:
- Define the source image to start from - typically the latest Windows 11 multi-session and M365 Apps image.
- The configurations and customisations to apply e.g. FSLogix & Shortpath.
- Where to publish the finished image - I recommend an Azure Compute Gallery.
Once created, the template runs the image build unattended. A temporary virtual machine is used to apply configuration, after which the image is generalised, published and then ready to use for deployments.
How Do They Differ From Traditional Approaches?
Below are a few key points to highlight how they differ from traditional approaches; but we will come onto this subject more later in the blog, where new meets old.
- There's no need to manually build an image VM.
- Image creation doesn't rely on engineers directly configuring the image.
- The output integrates seamlessly with Azure Compute Gallery for versioning and publication.
Using Custom Image Templates, image builds become repeatable and consistent making it easier to scale and manage your AVD environment.
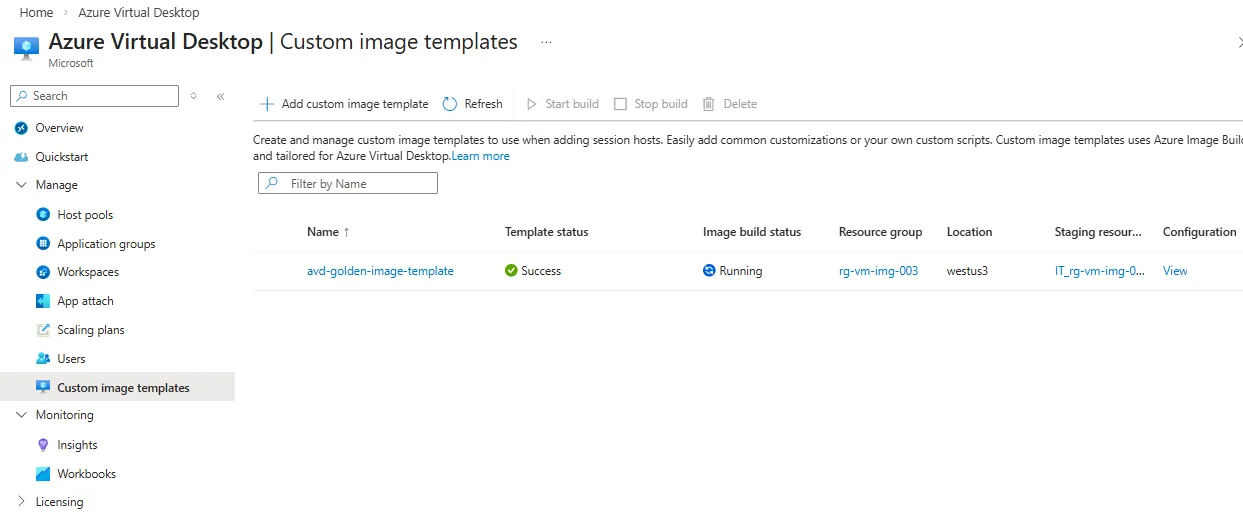
To find Custom Image Templates, navigate to the Azure Virtual Desktop blade -> Manage -> Custom Image Templates.
Tip
Custom Image Templates don't remove the need to think carefully about what belongs in a golden image. In fact, I've added a section later in the blog that almost contradicts the sole use of Custom Image Templates!
Why Compute Galleries Matters for AVD Images
Azure Compute Gallery is the recommended destination for images built using Custom Image Templates. Rather than producing a one-off image, compute galleries provide a way to store, version and distribute images that can be re-used across Azure Virtual Desktop environments.
| Capability | Legacy Managed Image | Azure Compute Gallery (Recommended) |
|---|---|---|
| Intended use | Reusable image | Reusable and versioned images |
| Region support | Single region | Multi-region replication |
| Image versioning | No native versioning | Built-in version control |
| AVD scalability | Limited | Designed for scale |
| Image Builder support | Supported | Supported |
| Operational model | Legacy | Recommended approach |
Note
Managed Images can still be used to deploy VMs but are now considered a legacy image method. Azure Compute Gallery provides versioning, replication and improved deployment at scale; making it the preferred approach.
Prerequisites & Design Decisions Before You Start
Before creating a Custom Image Template, there are a few pre-requisites and design choices knowing from the get-go.
Required Resource Providers
Custom Image Templates rely on a number of resource providers. Most of these will be registered by default, but not all of them are. Resource providers are a subscription-level setting, so make sure you check!
At a minimum, the following providers must be registered:
- Microsoft.DesktopVirtualization
- Microsoft.Compute
- Microsoft.Network
- Microsoft.Storage
- Microsoft.KeyVault
- Microsoft.VirtualMachineImages
- Microsoft.ContainerInstance
From my experience, Microsoft.VirtualMachineImages and Microsoft.ContainerInstance were the providers that were not registered in my subscription. If the providers are not registered, image builds will fail.
Resource Groups for Image Builds
Custom Image Templates use two different resource group concepts. Firstly, the resource group that stores the image template, and then the staging resource group used by Azure Image Builder during the build process.
The resource group containing the Image Template does not need to be empty. However, I would recommend using a dedicated resource group for image-related resources.
The staging resource group hosts the temporary resources required during the image build. Azure Image Builder can create this automatically which is the easiest method. If you create and use your own - this resource group must be empty.
Identity, Networking & Permissions
We won't spend too long here, as the next section covers the managed identity, but at a high-level, you'll need:
- A user-assigned managed identity with RBAC roles.
- VNet access for the image build process.
- RBAC roles that span multiple resource groups and resources.
These areas are closely linked for the build process, and a missing role can cause the process to fail.
Identity and Access: Using a User-Assigned Managed Identity
Identity and access is super important when it comes to Custom Image Template setups. When I was testing this, my first image build failed on permissions!
Managed Identity Strategy
A managed identity provides an identity for Azure resources to authenticate against Azure services without the need for traditional credentials. For Custom Image Templates, this identity is used by Image Builder to access networks, build/write images and interact with relevant resources.
There are two types:
- System-assigned - Microsoft-managed, no user configuration required.
- User-assigned - Customer-managed, configurable and available across resources.
For Custom Image Templates, a user-assigned managed identity is the option to choose. This identity can then be used across multiple templates and makes it easy to scale with permissions configured once.
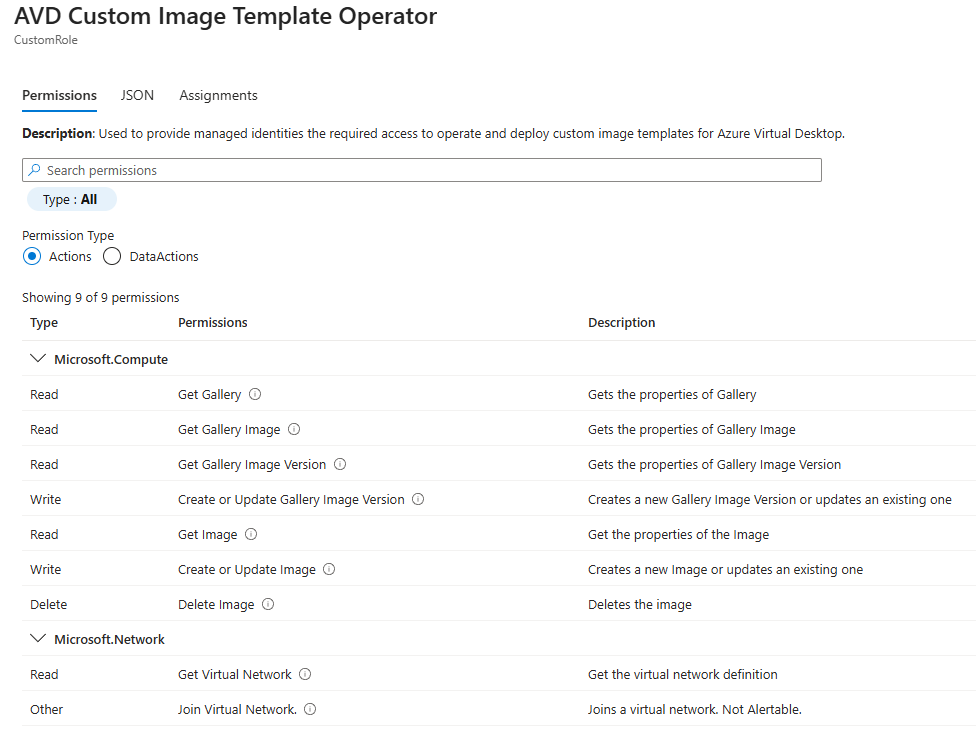
Custom RBAC Role for Image Builds
Built-in Azure roles such as Contributor can provide the required permissions for Custom Image Templates, but they grant far more access than is required and are difficult to justify to CISOs!
Microsoft recommends creating a custom RBAC role specifically for image builds which is then assigned to the user-assigned managed identity.
At a high-level, the role needs to allow:
- Access to the image build resources.
- Access to the Azure Compute Gallery and Image Definition.
- Read and join permissions on the virtual network used during the build process.
These permissions span multiple resource groups; it's common for the image build resource group, virtual network and compute gallery to all live in different locations.
Resource Group & Network Considerations
Custom Image Templates do not require the resource group containing the template to be empty.
My recommendation would be to use a dedicated resource group for image-related resources; to keep these separate from other AVD-related services.
A few reasons to separating:
- Isolates image build permissions from Production environments.
- Keep image-related config away from Host Pools & Session Hosts.
- Make image-related costs & lifecycle management easier to track.
From a networking perspective, the image build process runs inside the chosen VNet.
PrivateLinkService Considerations
One network setting that tripped me up was also the Private Link Service Network Policies. When using an existing VNet for an image build, the subnet policy needs to be disabled for Image Builder to work correctly.
This doesn’t disable Private Link or Private Endpoint, but it disables the setting on the subnet used for the image build.
The privateLinkServiceNetworkPolicies setting must be disabled on the subnet used for the image build. Here is an Azure PowerShell script you can use, just change the subnet, VNet and resource group names.
Azure PowerShell
$subnet = 'default'

$net = @{
    Name              = 'myVNet'
    ResourceGroupName = 'myResourceGroup'
}

$vnet = Get-AzVirtualNetwork @net

($vnet | Select -ExpandProperty subnets | Where-Object {$_.Name -eq $subnet}).privateLinkServiceNetworkPolicies = "Disabled"

$vnet | Set-AzVirtualNetwork
Creating the Custom Image Template
Once the pre-requisites are in-place, creating the Custom Image Template itself is relatively straightforward. I've found that the complexity is more around the permissions and design decisions than the template wizard.
At a high-level, the process looks like this:
- Create a new Custom Image Template from the Azure Virtual Desktop.
- Select a base image.
- Define configurations and customisations.
- Publish the image into an Azure Compute Gallery.

Selecting The Source Image
For AVD, the most common starting point I'd recommend is Windows 11 Multi-Session w/ Microsoft 365 Apps.
This provides a typical baseline with Windows, Microsoft 365 Apps and FSLogix already installed, reducing the amount of work required during the image build.
Azure Compute Gallery
During template creation, you will associate the template with an Azure Compute Gallery and an Image Definition within that gallery.
If you’re creating a new Image Definition for the template, don’t manually create the initial image version. The template build will create this when the completed image is published.
Existing Image Definitions can already contain previous versions, with future builds publishing additional versions as required.
Build Timeout Behaviour
The template includes a build timeout setting. In most scenarios, the default value is sufficient and does not need adjusting.
If the build completes early, it will finish and publish the image without waiting for the entire timeout period. Increasing the timeout is rarely required, so all I would suggest here is leaving this at default.
Built-In Configuration Options
Custom Image Templates offer a number of built-in configuration options directly in the portal. These are focussed on platform and session host performance and behaviour, as opposed to application packaging.
Options available include:
- Language, regional and time-zone settings.
- FSLogix installation and basic profile configuration.
- Session timeouts.
- Multimedia redirection (MMR).
- RDP Shortpath.
- Kerberos and Entra ID integration.
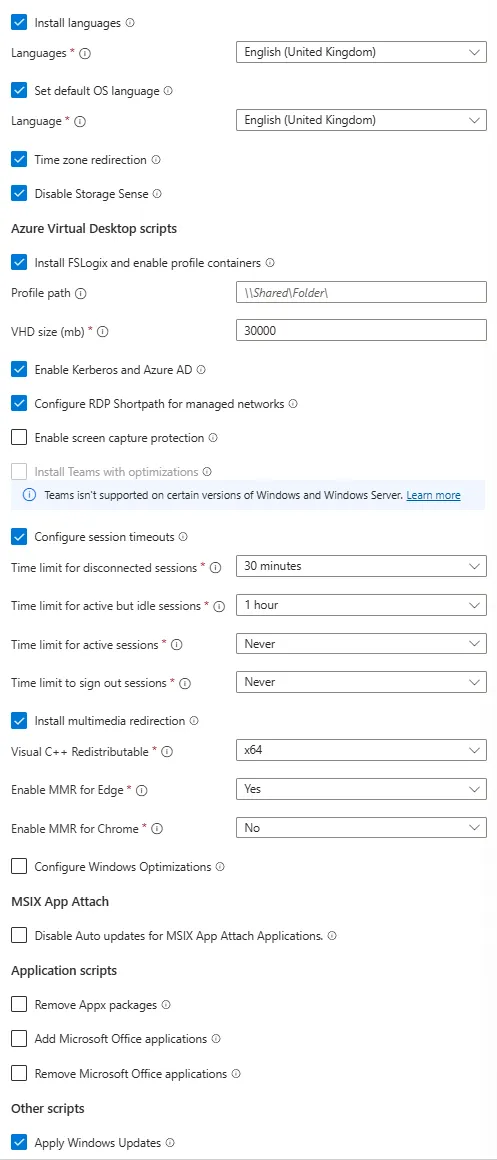
FSLogix can be installed as part of this template and the required registry keys are implemented automatically. However, for session hosts not created from this image, use my FSLogix utility to configure FSLogix the right way, the Microsoft way - you can find that here!
Authentication & FSLogix Considerations
This is an area where Custom Image Templates can look simple, but there are certain considerations when it comes to authentication and profile management.
Kerberos & Entra ID
Custom Image Templates include the operation to enable Kerberos and Entra ID as part of the image build. This prepares the session host to support Kerberos-based authentication that is commonly required for FSLogix profiles stored and used with Entra Domain Services or purely Entra ID.
 The AVD Directory Services Maze: Simplified & StandardisedRead article
FSLogix in Custom Image Templates
Custom Image Templates can install FSLogix as part of the image build, and for IT teams, this does the job.
This effectively:
- Installs the FSLogix application.
- Applies the required registry keys.
- Configures the core profile settings including profile location and default profile size.
But this tool doesn't cover:
- Session hosts that already exist and were not built from this image.
- FSLogix settings that need to change without rebuilding the image.
In this case, Custom Image Templates should be used, and should existing session hosts need to be updated, either re-image them with the correct image, or use my FSLogix profile utility to re-apply the storage account locations and re-apply the best practice registry keys.
Performance and Reliability: Build VM Sizing & proxyVmSize
Azure Image Builder uses a temporary virtual machine to stage the image building. Image Builder uses this VM, in a staging resource group to build the image, apply required configurations, installing any components and generalising the image for use.
The size of this VM is controlled by the Build VM size setting within the Custom Image Template.
Build VM Size
Don’t under-size the build VM. Image builds usually involve:
- Application installations
- Windows Updates
- FSLogix & AVD optimisations
- Custom PowerShell scripts
- Image generalisation & validation.
Microsoft recommend using a Standard_D2_v2 or equivalent for image builds. For complex images, increasing the Build VM size can provide additional CPU and memory to speed things up!
The proxyVmSize Gotcha
There is another VM you may come across called the proxy VM. This is different from the Build VM and doesn’t do the image build itself.
The default proxyVmSize uses a Standard_A1_v2.
During my testing, image builds were taking a long time, when using the default proxy VM. After increasing the proxyVmSize, I saw a massive reduction in time taken to build the custom image!
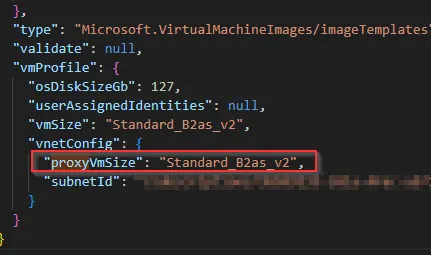
At the time of writing, existing Custom Image Templates cannot be updated in-place to change the proxy VM size. This is an important limitation, and one I learnt when I tried to do it!
The workaround is:
- Export the Custom Image Template JSON.
- Update the proxyVmSize value to a larger VM. I chose a Burstable VM, higher spec but lowest cost.
- Upload the updated template - I would use Azure CLI within a cloud shell.
- Run the image build using Azure CLI.
Tip
Once a template exists, changing proxyVmSize requires working with the JSON directly. This isn't shown in the Azure portal.
AVD Images - Things to Note
Custom Image Templates and Azure Image Builder work best when used with intent and consideration.
Why Not Everything Belongs In The Image
AVD images should focus on core platform components such as:
- The operating system.
- Microsoft 365 Apps.
- AVD & Windows optimisations.
- FSLogix configuration.
- Core applications.
Adding every application to the image can increase rebuild frequency and makes image management harder over time. Likewise, pushing all applications to install via Intune can impact sign-in times and VM performance.
Legacy Applications Still Impact Decisions
Some legacy applications cannot be installed cleanly using winget or unattended PowerShell. In these cases, full automation through Image Builder is not always possible.
Common examples of these include:
- Applications with interactive installers.
- Older .exe packages with hard-coded paths or dependencies.
- Software that requires manual configuration during install.
Image Builder still adds value to build the baseline, but it sometimes won't complete the whole job.
A Hybrid Approach
In real-world environments, a common workflow looks roughly like the below.
- Use Azure Image Builder to automate around 80-90% of the image.
- OS installation.
- Microsoft 365 Apps.
- FSLogix.
- AVD optimisations.
- Deploy the image to a temporary VM.
- Manually install and/or configure the remaining legacy applications.
- Re-run sysprep and capture the image.
Operational Cleanup: Staging Resources Explained
When a Custom Image Template is created, Azure Image Builder creates a temporary staging resource group to support the image build process. This resource group is separate from the resource group containing the image template.
During an image build, the staging resource group usually contains:
- A temporary virtual machine used to apply configuration and prepare the image.
- Supporting network components required for the build.
- Disks and other standard resources required for the image to be created.
Tip
Once the image has been successfully published to the Azure Compute Gallery, the staging resource group can be deleted if you no longer need the logs.
When It Is Safe To Delete
The staging resource group should only be removed once the image build has been successful, the image version shows in the gallery, and that the image build process is showing completed.
The staging resource group and any remaining resources should only be removed once:
- The image build shows as completed successfully.
- The image version is visible in the Azure Compute Gallery.
- The image is no longer running in a queued state.
Don't touch the staging resource group whilst the image build is running.
Wrap Up: When and Why Use Custom Image Templates
Custom Image Templates make sense when MSPs and IT teams need a repeatable and supportable way to build golden images for Azure Virtual Desktop. This is particularly important in environments with multiple session hosts.
For most production AVD environments, Custom Image Templates and Azure Compute Galleries is the right way to go. Images are then built in a consistent way, versioned properly and provide the required scalability.
Comments (0)
No comments yet. Your first commenter will appear here.
Leave a comment
Join the discussion
Become a member of 9to5Azure to start commenting.
Already a member? Sign in